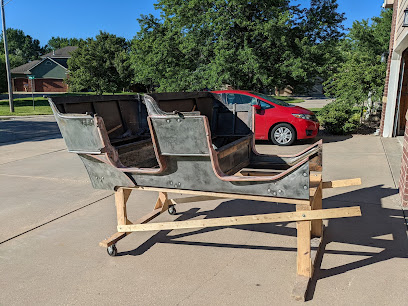
As I mentioned in a previous post, this Model T spent the first 110 years of its existence in Southern California. That made the restoration of the body much easier. A prior post mentioned that I had to repair some rusted areas on the fender flanges where they attach underneath the running boards. Thankfully, that was the only sheet metal restorative work that I needed to do.
The car's documentation indicated that it had been painted by the 2nd owner in 1949 when he completed a cosmetic restoration of the car. It is possible that the car had been painted once before, as the pictures of the original owner with the car from 1923 do not appear to have any pinstriping on the body, which apparently was standard when the car was made. Either way, the car body needed to be taken down to bare metal for paint prepping.
The wood framework for the body was in excellent shape. The only repair work needed for it were on the wooden door sills. Although they had thin, brass step plates installed, they really were not a great place to step. The edges were worn and a bit damaged due to people stepping on them over the years. They were repaired and strengthened with a layer of fiberglass, followed by some body putty to fill the weave. The following pictures show the body after the paint had been removed.
Body after paint was removed and door sills repaired
There were a few dents in the thin sheet metal that were removed as much as possible, followed by some body putty. That can be seen in the second picture. Removing paint is not the most enjoyable job, and any tools to help with the mechanical stripping makes the job go quicker. Two tools that worked for me were the Harbor Freight angle grinder with a wire brush attachment and an orbital sander shown below. The grinder was particularly helpful, as it was also used to strip the paint off the chassis parts that I did not have blasted.
Tools that made paint stripping go much easier!
Ford used several companies to make the bodies for the Model T until the early 1920s. One of the companies was Baudette, who made the body for this car. Like the other body makers, they originally made horse drawn carriages. Baudette made over 2 million bodies for the Model T from 1910 through 1922, and each had a serial number on it. Initially they stamped the number on the wood seat frame, as shown below. Later they attached a stamped metal plate on the wood frame. These tended to come off over time, as is the case with our 1915 Model T runabout. The only way that I know that the body was a Baudette for that car is that it has a "B" stamped on the sheet metal piece below the seat frame.
Baudette Body Serial Number
While the body frame woodwork was very solid, there were two wooden components that I needed to replace. The first were the removable front floor boards. The originals were just falling apart after years of use. The second area was the floor of the storage area under the rear seat. This is where the previous owner had the battery located that was used to energize the engine coils to make hand starting easier. Unfortunately, the battery had leaked some acid and rotted some of the boards. The front floorboards are made and sold by Snyders, and really well made. The baggage floor was made by me using Poplar wood. Both are shown below.
New Front Floorboards
New Baggage Floorboard


