Introduction

Introduction

How did I end up with two Ford Model T's, and why did I start this blog?  Well, it started in June of 2018, when my wife and I went to t...

Saturday, May 24, 2025

Installing the upholstery and top


With the painting complete, it was time to install the new upholstery and top.  They are pretty much the go to company for Model T and Model A interiors now.  Fortunately they make very good kits.  They come with rather sparse instructions, so it pays to look for online videos and read what you can find on the Model T forum for installation tips.  Both the kits come with factory authentic crude looking nails to use for the installation, but I prefer using a pneumatic stapler.  I suspect that “Henry” would have used such a stapler if they’d existed during the Model T production, and they make the installation work go much easier.  All the staples are hidden if you do the installation correctly, so no one has to know! 

The earliest picture of the car from 1923 shows that the original top had been replaced at some point prior to that.  That top differed from the factory version by having a glass oval window with a brass frame for the rear window.  I had Classtique leave the rear plastic window out of the top kit that they made for the car so that I could reinstall that window.  It is the one unique feature that ties the all the pictures of the car through the years together. That replacement top also did not have the ability to roll up the rear top for increased ventilation like the original factory version.  The top kit from Classtique did have this feature, so I had to install the oval window into this flap.  The oval window is smaller than the original factory plastic window, so I am glad that I would have the option of rolling up this flap for improved visibility. 

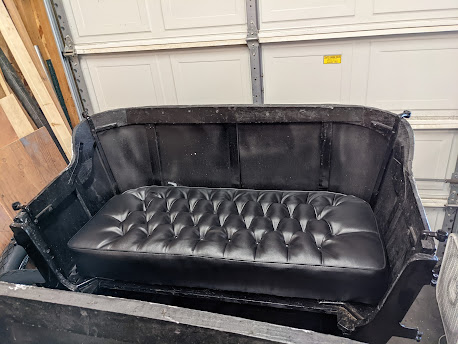
The upholstery needs to be installed before the installing the top though.  Recovering the seat cushions is the first step.  The picture below show the seat springs.  They looked like something from a century old mattress.  Some of the spring coils needed to be reconnected to the braces shown in the picture.  Installing the new covers requires compressing the whole cushion while attaching the new seat cover to the wire frame.  There is a very good Classtique video on their website showing how to do this with two 2x4 clamps.  Once compressed, the cushion is attached to the bottom wire edge using what are called "hog rings", which sort of look like nose piercings you may have noticed some people like to wear.  They are crimped using a special tool, which I now have in my toolbox for any future Model T upholstery work or to crimp on any body piercings someone wants me to do for free.

Though introduced in the fall of 1908, the Model T did not come equipped with seat back springs until the 1915 Model year.  Since this car is from 1911, that meant that any lumbar support was going to come from the seat back upholstery.  The third picture shows what the seat back looked like before the back upholstery was installed, with the fourth picture showing the seat back that is heavily stuffed with a cotton like substance.

Installing the seatback is the most difficult part of the upholstery installation.  You need to center the back and start attaching it from the center and chase it around to the end on the left and right side.  Installing the top edge requires even more care, as the stuffing needs to be worked to fill out the sleeves between the seams and the edges darted to go around the corners.  As I mentioned earlier, a pneumatic staple gun was used instead of the provided primitive nails.  I cannot imagine how much hard it would be to install using those.  The forward end of each armrest needs to be carefully folded, sort of like wrapping a present.  Later Model years had end caps which would make that easier.  I had taken a lot of pictures of the original upholstery before removing it so that I saw how the Baudette factory workers installed it in 1911.  Baudette was the maker of this car's body, and was one of several former carriage companies that made bodies for the Model T.  The last step is installing the trim strip, using black thumbtack looking nails.  You can see what the trim strip and tacks look like in the picture showing the rear door interior panel installation.  Overall I was very happy with how the upholstery installation turned out, and as it turned out, the seats are pretty comfortable without seatback springs.  

Installing the top brings another opportunity to learn long lost skills!  My first top installation was on the two seat 1915 Model T that I installed, which was a lot easier because it had only one top bow.  Before starting the top installation, I temporarily mounted the body to the chassis frame because the front straps for the top attached to the headlamp forks when the top is up.  A secondary benefit of doing it this way is that the body is lower to the ground, so that much of the work could be done while standing on the ground.  This was not the case when I installed a new top on our 1921 Model T a few years ago.  The body was installed on the car and required using a step ladder to reach the upper areas of the work.

The top bows needed to be wrapped first, which is very difficult because the vinyl type fabric provided does not easily stretch around compound curves.  I found that it worked best to start by using spray adhesive to attach the material to the bottom side of the bow and work it around the square wood steam bent bows.  Eventually the material needs to have darts cut along the edges to allow them to wrap around to the upper side.  These darts are done so that they are on the top portion, and remain hidden after the material is stapled on the top.

The touring cars have two top bows, which need to be kept parallel while installing the top.  I used a series of lath strips temporarily  hold them in place, along with ratcheting straps.  A bubble level and just inspecting visually will help get these located correctly.  Once located, the forward to aft straps were located and stapled on the top of the bows, and the corner pads located, stapled to the corner of the bows,  padding installed and the upper side sewed together.  

Finally it was time to locate, trim and stable down the top.  A lot of time was spent getting this located correctly. Although the corner pads are attached to the two middle bows, the top is not.  Otherwise the top will tend to tear out the nail or thumbtack used to attach the top to those bows when the top is being put down.  

The rear piece of the top is also installed at this time, including installing that pre 1923 brass framed oval glass window.  Brass quarter turn fastener are used to secure the rear piece when down, as well as to attach the lower edge of the top to the car.  Prior to 1915, the Model T tops could be completely removed if the owner so desired.  The tops were permanently attached along the rear bottom edge after that.

The body was now done and it was time to assemble the engine, rear axle.  After that, assemble the car and get it on the road!


The seat cushion springs...

Comparison of the original seat cushion and new cushion

Rear seat before back installation.  There are no cushion springs for the back.

Seat back upholstery before installing


Rear seat back finished and front seat back installation underway

Upholstery installation finished!


Rear door upholstery panel

Getting the top bows located prior to adding the corner pads and center straps

Center straps installed

Corner pads installed

Fitting the top 


Pre 1923 replacement top oval window installed


Top installation finished


Saturday, February 17, 2024

Painting the car

 Looking at the blog dates, I noticed it has been one year and one day since my last entry.  No excuse other than being busy with other stuff and that it is more enjoyable working on old cars than WRITING about them!

Anyway, after I got my "paint booth" made, it was time to prime and paint the car.  Like when I painted our 1915 runabout, I was at this stage of restoration during the hottest part of the year.  Too cold or too hot can cause issues when it comes to painting.  

I primed the body parts using a two part direct to metal urethane primer.  Even with the reducer, it is still pretty thick; almost like spray "Bondo".  It wet sands nicely and provides a good foundation for the paint.

I used a single stage, two part urethane paint when I painted our runabout, and did the same for this car.  With a urethane paint job, you can do a single stage paint or base color coat with clear coat paint.  I prefer the single stage paint for painting Model Ts because I don't want to blow through the clear coat during the final sanding/buffing stage. 

One of the main advantages of using a urethane paint is that you can use progressively finer grades of wet sandpaper, followed by two stages of buffing compound that will result in a mirror smooth paint job when done.  I covered the process in more detail on a posting on the Model T Ford Club of America forum site after I painted our runabout, and those interested can read about that process here:

https://www.mtfca.com/phpBB3/viewtopic.php?f=2&t=6764&p=51027#p51027

After about 40 hours of priming, painting, wet sanding and buffing, the job was done.  I was happy with how it turned out.  This would have been a very expensive paint job if I had it professionally done.  Here are a few pictures of the progress, along with the finished body with the firewall installed.  I used the original firewall, which was broken in multiple pieces, as a template to locate the Ford patent plate and the brass California Vehicle Registration tag where it was originally screwed on well over 100 years ago.


Priming the body


Primed various parts

Finished front fenders

Finished body with firewall installed

Firewall and coil box temporarily installed

California Vehicle Registration tag installed in same location as on original firewall


Thursday, February 16, 2023

Poor man's paint booth

 I mentioned in my previous entry that I used a three sided tent paint booth for painting all the chassis bits and pieces.  I used that tent for painting fenders and splash boards on the 1915 runabout, but it was a bit cramped for that.  I decided that this time I would need to come up with a better plan.

What I came up with was making a paint booth using heavy plastic drop cloth from Lowes, with the framing being supplied by the 3rd bay garage door and its rails.  The pictures below show the resulting booth.  I also used a couple of heavier drop cloths from Harbor Freight for to cover the floor.  I used spring clamps to hold the pieces together, which can be seen in the first picture.

Overall, it worked very well.  HPLV  guns, by the nature of their design, are LOW pressure.  That helps keep the overspray down.  However, I still got some overspray on the floor in spots.  I figure that just adds character to the garage.  

I also put plastic drop cloth over our 1915 runabout, which was in the garage when I painted.  No overspray got on it, which I was certainly glad about.


Painting the bits and pieces

 Doing a complete restoration of a Model T requires paint A LOT of bits and pieces.  Fortunately, in most cases this means painting a lot of pieces black.  Like the first T that I restored, I used Eastwood's gloss Extreme Chassis primer and glass black paint.  It requires no mixing, sprays well and looks nice when done.

I used a three sided tent as my spray booth.  I first got it when I restored our 1915 runabout, and it works well for smaller parts.  The picture below show the booth in the 3rd bay of our garage, along with some of the parts after painting.  My least favorite chassis parts to paint are the wheels.  

The second picture shows some of the many parts drying on a temporary "clothes line" that I installed under our deck.  I used a smaller HPLV gun to paint all the chassis parts, and it was good practice for painting the fenders and body, which was next on the to do list.  


Some of the many chassis parts painted

Parts drying under our deck


xxxx


Monday, January 30, 2023

Prepping the body for paint

 As I mentioned in a previous post, this Model T spent the first 110 years of its existence in Southern California.  That made the restoration of the body much easier.  A prior post mentioned that I had to repair some rusted areas on the fender flanges where they attach underneath the running boards.  Thankfully, that was the only sheet metal restorative work that I needed to do.

The car's documentation indicated that it had been painted by the 2nd owner in 1949 when he completed a cosmetic restoration of the car.  It is possible that the car had been painted once before, as the pictures of the original owner with the car from 1923 do not appear to have any pinstriping on the body, which apparently was standard when the car was made.  Either way, the car body needed to be taken down to bare metal for paint prepping.

The wood framework for the body was in excellent shape.  The only repair work needed for it were on the wooden door sills.  Although they had thin, brass step plates installed, they really were not a great place to step.  The edges were worn and a bit damaged due to people stepping on them over the years.  They were repaired and strengthened with a layer of fiberglass, followed by some body putty to fill the weave.  The following pictures show the body after the paint had been removed.


Body after paint was removed and door sills repaired

There were a few dents in the thin sheet metal that were removed as much as possible, followed by some body putty.  That can be seen in the second picture.  Removing paint is not the most enjoyable job, and any tools to help with the mechanical stripping makes the job go quicker. Two tools that worked for me were the Harbor Freight angle grinder with a wire brush attachment and an orbital sander shown below.  The grinder was particularly helpful, as it was also used to strip the paint off the chassis parts that I did not have blasted.  


Tools that made paint stripping go much easier!

Ford used several companies to make the bodies for the Model T until the early 1920s.  One of the companies was Baudette, who made the body for this car.  Like the other body makers, they originally made horse drawn carriages.  Baudette made over 2 million bodies for the Model T from 1910 through 1922, and each had a serial number on it.  Initially they stamped the number on the wood seat frame, as shown below.  Later they attached a stamped metal plate on the wood frame.  These tended to come off over time, as is the case with our 1915 Model T runabout.  The only way that I know that the body was a Baudette for that car is that it has a "B" stamped on the sheet metal piece below the seat frame.


Baudette Body Serial Number

While the body frame woodwork was very solid, there were two wooden components that I needed to replace.  The first were the removable front floor boards.  The originals were just falling apart after years of use.  The second area was the floor of the storage area under the rear seat.  This is where the previous owner had the battery located that was used to energize the engine coils to make hand starting easier.  Unfortunately, the battery had leaked some acid and rotted some of the boards.  The front floorboards are made and sold by Snyders, and really well made.  The baggage floor was made by me using Poplar wood.  Both are shown below.

New Front Floorboards

New Baggage Floorboard


Sunday, October 16, 2022

A long day at Mike Bender's shop

 In a previous blog entry I mentioned that the engine block needed some repairs that required brazing.  Properly doing that required the block to be preheated in an oven, which unfortunately melted the crankshaft bearings in the block.  

Normally we think of bearings being made up of a series of steel balls or cylinders that allow a shaft to rotate freely.  However, the Model T crankshaft, and many cars during the first few decades of automobiles, did not use a traditional bearing.  Instead the bearing was a metal called Babbitt, made up of an alloy of mostly tin, copper and antimony.  This material lined the surface of the block and bearing caps that come in contact with the three crankshaft journals of the Model T engine.  

Putting new Babbitt bearings into a Model T block requires molds and the ability to carefully line bore the resulting bearings to ensure that the three bearings are in a straight line, and have a clearance of 0.002" with the crankshaft.  0.002" is a really small clearance; 1/500 of an inch!

There are only a few places in the U.S. that have the equipment and experience to do the job.  Mike Bender in Tulsa, OK is one of those experts.  Mike rebuilt the engine for our 1915 Model T runabout in 2019, and offered to repour and drill the bearings for the engine block for our 1911 car.  

So in June of 2022, I made the three hour drive to Mike's shop to "help" Mike do the Babbitt work on the engine block.  It was an enjoyable, but long day as Mike poured the new oversized crankshaft journals and then carefully line bored the journals for the desired clearance.  The bearing journals were fine tuned by using a material called "Timesaver", which is an abrasive paste that is applied between the crankshaft and journals that finely cuts the Babbitt until there is a clearance of 0.002".  Pretty cool stuff, and much quicker than the original method of scraping the bearings with a special knife to remove small amounts of material.

We finished up around dinner time, and drove home after a long but productive day.  The block was now ready to go to a machine shop to have the cylinders bored for some oversized pistons and to have the valve seats reworked.


Mike pouring the #1 crankshaft bearing


Line boring the new Babbitt journals to the proper diameter


Thursday, October 13, 2022

Frame finishing

 The early cars, like the Model T, used a frame that supported the axles, engine and body.  Eventually car designs adopted a uni-body construction.  As I did with our 1915 Runabout restoration, I decided to have the frame powder coated instead of painting it.  The main reason was to have a much more durable coating than paint.  For the same reason, I had the running boards powder coated because they are stepped on every time someone gets in or out of the car.

I took the frame and the running boards to the same company in Wichita, LORAC, that I used when I restored our Runabout.  I've been told that the strange name is just "Carol" spelled backwards, and is apparently named for the owner.  I brought parts to them last May and after about a week or so, I was able to pick them up.  What was a grimy frame now looked sparkling new!


Thursday, September 22, 2022

Working on the body

Restoring a car that spent 110 years in southern California is wonderful.  No rust and no wood rot.  Many people may not know that the Model T bodies were all wood for the first couple years of production, and continued to use for the body frame throughout its production.  1911 was the first year that the bodies had steel skins that were nailed onto the wood frame.  These bodies were not initially made by Ford, but by former carriage companies that he subcontracted the work to.  This particular body was made by Baudette, which also made the body for our 1915 runabout.  Eventually Baudette was purchased by Fisher body, which eventually was purchased by General Motors and made car bodies for GM until it was dissolved by GM in 1984.

The body styling was one of the many changes that Ford incorporated into the car during the 1911 and 1912 model year. 1911 was the only year that Ford made the "step side" style of body with steel skins.  The step side body, used since the car went into production in late 1908, is characterized by having the door sills and the front and rear seat compartments overhanging the narrower bottom of the body.  These features were deleted during the 1912 model year resulting in a more "streamlined" looking body.  This car was one of the last of the step side Model T's before the new bodies were serialized into the production line in early 1912.

Disassembling the body was messy, but uneventful.  LOTS of dirt accumulated in the various corners of the body and under the upholstery.  The original leather upholstery was in pretty bad shape, so it will be replaced with new upholstery from Classtique Upholstery.  It was interesting removing the upholstery and being able to see evidences of original paint.  The ugly green that was on the car when I bought it was painted in 1947 by the second owner.  The evidences of paint that I found under the car showed that the car was black originally, or what appears as black now.  It was also interesting to see some chalk marks on one of the seat backs that apparently one of the Baudette workers did back in 1911.

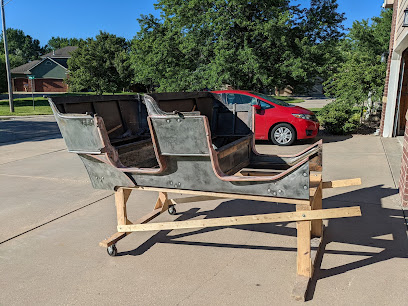
Doing a "frame up" restoration of course means getting it off the frame!  It is very helpful to have some sort of dolly that the body can be attached to for moving it around while working on the body and painting it.  I basically used two 2x4's that rested on some paint cans and furniture dollies when I restored the 1915 runabout.  I was not going to make that mistake again.  This time I built up a "rickshaw" shown in the second picture.  It worked much better, and it allowed me to move the body around as needed.


The body before removing the upholstery and paint


Dolly used for moving and working on the body


Tuesday, June 28, 2022

I'm cheating in this area

The Model T Ford mechanical and electrical system remained largely unchanged during its production run from late 1908 through 1927.  There were good improvements the ignition system during that time, the most important, in my opinion was the change to the standardized "KW style" ignition coil in 1913.  

The Model T ignition coil box, contains four coils that "buzz" and the electrical spark to each cylinder.  Ford bought these coil box assemblies from several suppliers before 1913, including Heinze, Kingston, Jacobson-Brandaw and K-W.  Each company's ignition box contained their own particular coil design, which were not interchangeable with the other's.  Lacking interchangeability is a manufacturer's and customer's nightmare.  

For those who have never seen a Model T coil, it is probably the best example of "steam punk" technology on the car.  It is a wood box filled crude looking electrical parts all encased in tar.  They take the low voltage alternating current from the car's built in magneto and converts it into a high voltage spark. The figure below shows the mysterious inner workings of the Model T coil box.  When operating, they each make a buzzing sound as the point open and close quickly.  These coils are enclosed in a box on the firewall and it sounds like a thousand angry bees trapped inside.

K-W coil used on all Model T's from 1913 and on

The pre 1913 coils tended to be finicky, making the car more difficult to run properly.  The big improvement was made by the K-W company with there new coil design, when they incorporated a "cushion spring" on the points mounted on the top of the coils.  The improvement was dramatic enough that Ford switched to this style of coil for the rest of the car's production.  A secondary, but important, benefit was that the cars now had a common size ignition coil that the customer could easily replace with a new one from Ford.  Eventually Ford even built these coils inhouse under license from K-W.

The 1911 Model T that I am restoring was originally equipped with the early style coil box.  Which is lost to history, because the first or second owner replaced it with a later year coil box that used the K-W coils.  Smart move.  The previous owner decided to correct this and found a used Heinze coil box that was correct for the car.  It must have worked well enough for him, because it was still on the car when I got it.

Heinze coils that came with the car

I was concerned about using the original style coils for the reasons given.  I like how the later K-W coils work, and I have experience rebuilding and tuning them.  There was only one guy in the USA who worked on the old style coils, and he unfortunately passed away a few months ago do to an apparent complication with the Covid booster.  He gave me some tips on how to check to see if the coils were good, and the Ohmmeter test that he suggested showed that all of the coils had a short in the windings, indicating that major surgery would be required to make those coils functional again.

I decided that this was one area that I was going to cheat on the restoration.  The Model T parts suppliers sell replica coil boxes that look like the early style ones, but are sized to accept the "modern" K-W ignition coils.  I got one of those boxes along with a new switch box that allows the driver to run the car on the engine's magneto or the standby battery.  Normally the battery is just used to energize the coils when starting the car.  Otherwise the driver needs to turn the crank at sufficient speed to generate the 4 1/2 volts needed.  This is really not a problem if the magneto system in the car is functioning well.  I almost always start our 1915 Runabout with the switch set to magneto.  The cars did not even come with the optional battery from the factory.  

The picture below shows the completed box with four early brass topped coils that I restored.  These coils were graciously given to me by Erik Larson, a Model T coil rebuilder in Idaho that rebuilt the coils for our Runabout a few years ago.  Since that time I have learned how to rebuild and tune them myself.


Replica Heinze coil box sized to accept K-W coils

The last picture shows a comparison of replica versus original Heinze coil box.  You can see that replica box is slightly larger.  The ignition wire attach locations are dimensionally the same, so no change is required for the firewall.  You may have noticed that the stain color is different.  I used Laurel Mountain Forge cherry stain, which is the most recommended stain by T restorers to match the original stain used by Ford.  My observation is that it does match really well the stain found on the original firewall that came with the car.  The original Heinze box may have been re-stained at some point.  Either way, my new coil box is going to work better and match the firewall!  

So, yes, I am cheating on the ignition system for this restoration and I am glad that I am!


Comparison of the original and replica Heinze coil boxes


Monday, June 27, 2022

Restoring the fenders

Scientists tell us that there are 118 elements in the periodic table.  I'll take their word for it, but for those of us who grew up in the Great Lakes area, we all know that there is an additional element; RUST.  I've mentioned before that this car spent 110 years of its existence in southern California, so that meant that there is not much of that dreaded 119th element included on this car.  The one area that I did find rust that needed repairing was on the fender flanges that attach to the bottom side of the running boards.  So why did they rust in these locations on a car located in sunny California?  The best that I can tell, the design is a natural trap for mud or water, which over time allowed them to rust.

The fenders and splash boards before the ugly green paint was removed

The first step in restoring the fenders was removing the paint completely.  The fenders are REALLY thin on these early Model Ts.  My dial calipers show that they are about 0.032" thick, or looking at it another way, 30 fenders stacked together would only be 1" thick.  What makes matters worse is that these early fenders did not have much 3D contours like later fenders, which mean that they are even easier to dent.  Instead of spending way too much time with an angle grinder equipped with a wire brush to remove the paint, I cheated and took them to Kansas Dry Stripping in Derby, Kansas that specializes in low pressure media blasting to remove the paint.  Traditional "sandblasting" would likely result in warping the fenders during the process.  I used this company to strip the paint on the 1915 Model T runabout that I restored a few years ago, and knew that they did great work.

I decided that the fenders were too thin to attempt to have the flanges repaired with brazing or welding.  Instead, I repaired them by structurally bonding steel doublers of the same thickness as the fenders and then encapsulated them with fiberglass for further reinforcement.  The fender repairs were cosmetically finished with body filler, resulting in stronger then new flanges.  

There were a few localized areas that also needed body filler to bring them back to original contour.  The front fenders also needed work to removed denting in the areas where the attach flanges mount on the front fenders.  I wondered how they could have been dented like this, and then I remembered the pictures of the 2nd owner letting different ladies to sit on the fenders to pose for pictures... The fenders are now done and waiting for priming and painting.


Fenders after being repaired and ready for priming and painting


Speedometer Restoration

 While I am planning on doing most of the restoration myself, there are a few items that I have decided that those with the specialized skill and tools are going to do instead.  Those include pouring and line drilling the crankshaft Babbitt, the cylinder and valve machine shop work, and the speedometer restoration.

Early Model Ts came equipped with a speedometer/odometer as standard equipment.  Eventually these became optional items during Ford's never ending quest to reduce the car's purchase price.  The 1911 Model T came equipped with a Stewart Model 26 speedometer; a completely mechanical device consisting of a long, flexible cable that connects the gearbox assembly attached to the right front wheel spindle.  Its little gear engages a bigger gear on the wheel, which turns the shaft that snakes its way up to the speedometer head attached to the firewall.  The following two pictures show the installation before it was removed from the car:


Stewart 26 Speedometer Installed on the firewall


Speedometer gearbox and cable installation

The Ford service manual does not have any maintenance information include for working on the speedometer. The Model T Ford Club of America publishes a series of booklets for working on various areas of the car, including one on restoring the speedometer.  It was on my Christmas list and I read it quickly thereafter.  It was then that I realized that it was going to be like working on a fine watch, and I figured that doing it myself would result in a shiny, but useless piece of brass attached to my firewall.

Fortunately the author of the booklet, Rust Furstnow, also restores these speedometers.  I soon contacted him and before long the speedometer assembly made its way to Arizona and back.  Wow, does Russ do nice work!  There were some parts that needed replacing, and the speedometer cable was from a Model T a couple of years newer.  He said that this was not surprising, as the 1911 cables tended to break.  The cable was too long resulting in it hanging rather close to the road, so he shortened it to the correct length.  I suspect that the cable broke fairly early on, as the pictures of the car with the original owner appear to show this too long of cable installed.  

Here are some pictures of the speedometer head and gearbox after I received them back.  They, along with the restored cable, are tucked away until they will be installed when the car is put back together.

Restored speedometer head


Restored speedometer gearbox


Tuesday, May 24, 2022

Diffusing a bomb

Restoring a Model T is not an inherently dangerous activity.  Sure, you should take the usual precautions like wearing safety glasses if grinding, wearing respirator if painting, using jack stands etc.  However, you reallllly need to do be careful when disassembling the leaf springs.  

Modern cars often use a combination of a coil spring and a shock absorber attached to each wheel to soak up the jolt you would otherwise get when driving over a pothole.  The Model T, and other early cars, instead used a "leaf spring" consisting of several steel rectangular pieces stacked together.  Basically it was a carryover from the horse wagons and buggies used before the car was invented.  It is no surprise that the bodies for the early Fords and other auto makers came from buggy manufacturers.  

If you ever had to take a physics class, you probably learned about springs.  How much a spring deflects under a certain amount of load depends on the physical dimensions of the spring, and the spring material's physical characteristics.  Leaf springs are sometimes preloaded and formed into an arch in order to provide the desired characteristics such as how high the car sits off the ground and how it handles while turning a corner.  

The Model T springs uses a lot of preload and curvature; a lot.  Not so much in the front axle spring as the rear.  Restoring the springs requires taking them apart to strip and repaint the individual pieces.  Taking them apart is like diffusing a bomb; something done with great care so that pieces don't go flying everywhere and hitting or hurting whatever is in its way.

This is the second time that I've taken T springs apart, so I was less nervous this time.  I start with the front spring because they have less preload.  The procedure for either spring is the same.  I start by using at least two parallel clamps to hold the spring together.  I then remove the pin holding the U shaped brackets toward each end that help the keep the leaf spring pieces stacked up correctly.  Then I loosen the nut on the bolt at the center of the spring assembly and carefully loosen the parallel clamps until the loosened center bolt is under load again.  I repeat the process until all the preload is removed.  The picture below show the process, including how much preloading the spring was under.  That was a lot of stored energy!

After painting but prior to reassembly, the individual pieces have a coat of "slip paint" applied to improve the sliding characteristics between the individual spring pieces.  The process is reversed for assembling the springs.  Reassembly is also less nerve wracking!


Model T rear leaf spring as removed


Starting to disassemble the rear leaf spring

Rear leaf spring disassembled


Disassembling the rear axle

The engine and rear axle of the Model T are the most mechanically complex assemblies that need to be taken apart for the restoration.  Like removing the engine, it is good to have some help getting the axle removed from the car.  Fortunately helper Alec was once again avialable.

The basic design of an automotive rear drive axle/rear axle engineer brother.  I'll take his word for it.  I kind of fog over when trying to understand how the Model T planetary transmission and differential in the rear axle work.  Anyway, here is a cutaway picture of what the Model T rear axle looks like for those interested.

Model T Rear Axle/Driveshaft assembly

This cutaway does not clearly show the two diagonal radius rods that attach from the front of the driveshaft to each end of the rear axle.  This can be seen in the picture below.  Engineers love triangles because they make a very stable structure.  These radius rods allow the driveshaft to stay properly oriented to the rear axle when the frame of the car is twisting as it goes over rough terrain.  The Model T was really the first successful SUV, because there were very few paved roads when it was introduced.  

Disassembling the rear axle/driveshaft

Following the handy Model T Service Manual made disassembly pretty uneventful.  My only problem was not covered in the manual; which was how to get the stuck driveshaft out of the rear axle "pumpkin".  It was supposed to come right out, but this one would not.  I finally hung it up like a deer hunter would do after a successful day out in the woods, and the driveshaft finally came free.  The problem was caused by a previous mechanic using sealer along the attach flange to keep it from leaking.

The Model T rear axle was pretty reliable, but had one design issue that every T owner should know about.  There are thrust washers installed on each axle shaft near the differential assembly.  These washers were originally made of a babbitt, a soft alloy used as the bearing surface for the engine crankshaft and piston connecting rods.  While it was (and is) a good solution for the engine, it was not a good thrust washer material.  Bad things can happen when a T driver least expects it if the babbitt washers disintegrate while driving.  Unfortunately, the only way to determine if these thrust washers have been replaced with more durable ones made of bronze is by removing and disassembling the rear axle.   Sort of like having to kill your pet to find out if it has rabies... 

I was planning on rebuilding this rear axle no matter what, so the difference would only be if I had to buy bronze thrust washers.  The good news was that the offending babbitt washers had been replaced sometime in its past.  One of the bronze washers can be seen on the axle shaft on the right side of the picture below.  

I should point out that the actual turning portion of the driveshaft and axles are enclosed in  cylindrical housings.  You can see how skinny the axle shafts are in the picture, compared to the robust axle housings.  The driveshaft is similarly skinny.  I went over to one of the local Model T guys to use some specialty tools that he had that make it easier to disassemble the driveshaft.  One of the parts that was supposed to be pressed on the the shaft just fell off.  Well that was not good.  The driveshaft bushing was pressed into the driveshaft housing and his special tool was very helpful in getting that out.  After that, the parts were all cleaned and the housings stripped of there paint.  The axle will be painted and reassembled later.  The only part that needed replacing was the driveshaft due to some cracking around the keyway at where the drive gear attaches.  The original driveshafts were forged(!) and only machined where they needed to by round.  The modern replacements are machined from a round steel rod and result in smoother ride.  If you have ever ridden in a Model T, you know that anything to make is smoother is a good thing.


Rear axle disassembled